A friend on Twitter posted a video for me about candle heating, done using Crisco as fuel and flower pots. Basically, it’s convection heating, more than radiant heating of the kind I generally use with my candles.
I was reluctant to try it, even though it sounded, “Hot.” I’m happy with my candle heating using paraffin and soy wax. Candle heating ~ Read more.
But, now that I’m almost out of paraffin, and I don’t want my plants to get chilled to death, I’m faced with having lots of soy wax and no good reason not to try the convection method of heating.
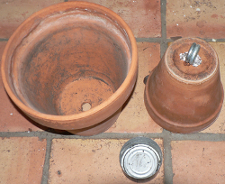
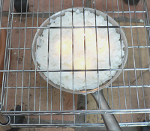
First step ~ Find the necessary pieces to make the Clay Pot heating shown in the video.
I didn’t think I had a small flower pot that would fit beneath one of the larger pots I have, but as luck would have it, I located one.
When each pot was somewhat dusted inside, I found some bolts, the kind with an eye so you can string wire or something like that through them, and used them to seal the drainage hole. Since the bolts weren’t a tight fit, I finished the seal using wadded tin foil. I hope it works.
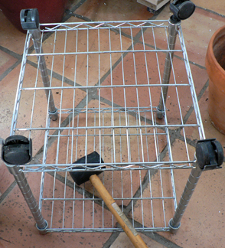
Second step ~ Make one of my chrome carts the right size to use for this kind of heating.
I love these chrome carts, they’re fun to put together ~ assembly is very easy when they’re new.
When resizing, it’s hard to dislodge the shelves and a rubber mallet is required.
Still, it’s wonderful that you can customize these carts over and over again for different purposes.
The shelves I used don’t come with wheels, but additional wheels are easily ordered from Whitmor for not very much money, plus shipping. The wheels fit in perfectly instead of the little leveling legs.
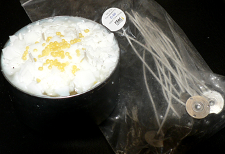
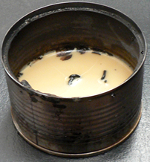
Third step ~ Melt soy wax, put tabbed wicks into the tin, pour wax around the wicks and let them set.
The wicks tended to fall over, so to stabilize them in subsequent candles I added some unmelted soy wax after I placed the wicks. That was quick and easy, and it worked.
I tried some other wick first, some I had taken out of votives I ordered, then realized I needed thicker wick to get any kind of heat at all. Those wicks didn’t work because the paraffin that stiffened them melted immediately upon being touched by the hot soy wax. Once it melted the wick was a piece of thread with no ability to stand up straight.
On top I added some bees wax pastilles for the fun of it. Those are the little yellow things.
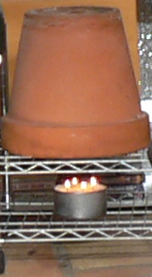
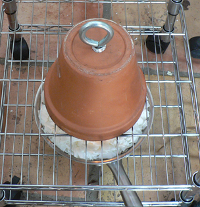
1:24 p.m. ~ All four little wicks are lit and the multi-wicked candle is in place under the clay pots. The temperature in here now is 50.9*. This morning it was 49.1* at about 8:30, so it hasn’t warmed up very rapidly today. At this point there’s a lot of sunshine from my clerestory, so that will help improve the level of heat.
Still, I think we will be able to see if the convection, clay pot heater makes an appreciable difference.
1:54 p.m. ~ Quick update: the pot is now showing a temperature of 60.7* on my infrared thermometer. Similar clay pots with soil and plants are registering 51.8* and 50.1*. The pot of hot water above my paraffin and soy candle, in my “traditional” candle heating, is registering 61.3*. (My infrared thermometer came with directions that said it wasn’t good for measuring temperatures of shiny objects, which the water pots are. But, then I’m partial to my form of heating and may well be making excuses.)
I was going to double check the temperatures and found that all of them had dropped about 5*. I think that’s what this little infrared thermometer does. Prior to ordering it I noticed that some reviews alluded to subsequent temperatures being different as a possible reason not to buy the instrument.
2:24 p.m. ~ Temperature in here now is 51.2*. That’s over one degree improvement. Not bad. In fact, it’s an excellent improvement for one hour’s time. OOPS!!! My math has not improved since I took the SATs decades ago and scored in the 22nd percentile nationally for maths. (Luckily I was in the 98th percentile for reading comprehension.) The temperature difference is less than half a degree. 🙁 But, that’s not bad given that the candle had to heat the cold pots before it did anything else. So, I’m still stoked!
Now, the next question is: How long will the four-wicked candle last?
3:24 p.m. ~ With most of my full spectrum plant lamps off for nearly an hour (they are a primary heat source for me and my plants) the room temperature has nevertheless climbed to 51.6*
5:51 p.m. ~ Well, I’ve put together another Flower Pot Heating set-up.
I didn’t have any choice for additional pots, so the exterior pot is larger while the interior pot is smaller than in the first set-up. I’m not sure how that will work.
Plus, I didn’t have another wide tin, so I used a somewhat less wide tin from pineapple. I put in three wicks, instead of four, so they wouldn’t be too close together.
When I lit it, a moment ago, it was 50.7* in here, so additional heat will definitely be a good thing for my plants, and me.
11:34 p.m. ~ One or both of the Flower Pot Heating set-ups has begun making a popping/cracking sort of noise. I can’t work out exactly why the noise is occurring. It could be that the tin foil is melting, which wouldn’t be good given that could put toxins in the air.
It could be that the chrome cart’s solder is giving way under the intense heat. I’ve not found a problem using the chrome carts with my candle heating, primarily because the heat is far less intense than under the smaller flower pot that is sealed at the top for the purpose of building up heat.
 Or, the crackling sound could be a result of the wax having melted considerably, so that the wick tabs are “dancing” from the heat and clacking, as it were, against the bottom of the tin. I don’t know.
Most likely, however, it’s that the clay pot held a lot of moisture given that the candle heating had resulted in an indoor humidity of 71% and above. Within hours of beginning to use convection (Flower Pot) heat, the humidity had gone done by over 10%. It would be possible, therefore, if not probable, that the residual moisture in the pots caused a noise as it dried completely out.
What is clear is that the wax melted away far more quickly than I anticipated. The man in the video said his candle had been going 5 days. Mine has been going 5 hours. He used his wife’s cake tin, however, which is probably about 5 times larger than my little tin.
Of the two set-ups, surprisingly the one that uses the larger pot got up to 75* which I can only surmise is a result of how much closer the three wick candle is to the small pot, than the four wick candle is, being about an inch further away. The additional inch of air may have a cooling effect beyond what I would initially imagine.
The noise has now stopped, more or less. It had gone on for about 45 minutes, altogether.
I’m a little worried about toxins.
There are still flames going in each of the two set-ups, so I don’t think the noise was related to the wick tabs, after all. If it were, the noise would be ongoing.
1/6/2014 ~ When I woke up about 3 this morning, the set-up with the larger pot began making a noise, and it began to smell like wax that’s too hot, or burning soot.
Since I don’t have the bottom of my Solatube covered, I was worried that soot would get into it and dim the light, so I found a tin plate and put out the candle wicks.
At the same time I saw that I had misjudged the smaller set-up, which was still burning fine, and indeed continues to burn efficiently this morning. At this point it’s only three hours short of having burned a whole day.
When the larger set-up cooled, I lifted the large pot, and nothing looked amiss. But, when I lifted the smaller pot it had a lot of soot in it, and the candle wax that was left was a caramel color, not dark, but no longer white by any means, which seemed to show that it had begun burning.
Since wax generally stays a light color, nearly white, I don’t know why the soy wax had turned dark. I don’t know why it was burning or at least, too hot. It could be that the pineapple tin has a lip, so the heat inside the tin was captured around the edges; certainly the tin itself had a burned look. And, to my surprise, I saw that I had put four wicks in, when I thought I had decided to put in three. I don’t remember changing my mind, so maybe I did it rather carelessly, just aping what I’d done with the first set-up.
This morning when I woke, after 9 a.m. (apparently my body wanted to make up for the time I spent on the candles around 3 a.m.) it was 46.7* in here. Way cold! So, I’m really glad I had the Flower Pot Heating, or it would have been even colder.
Now that it’s 10:39 a.m. the temperature has risen to 47.6 as a result of having on two GE Plant Lights, my large full spectrum lamp, and a small full spectrum lamp over my seed starter. Happiness!!!
Before I feel back asleep this morning I thought about how my omelet pan might work, if it doesn’t have one of those sandwich bottoms to increase and evenly distribute heat. Turns out it’s straight stainless, or appears to be, so I’ve put 4 wicks in it, surrounded them with soy wax flakes, and am going to pour soy as soon as the paraffin in my melting pot has melted and been poured into candle jars.
** Funny how the lit wicks in the omelet pan look a lot like eggs.
12:10 p.m. ~ The four candle wicks in the smaller set-up have gone out, so that’s nearly 24 hours of heat. Meanwhile the new, omelet pan set-up is heating up. In fact, within 15 minutes its temperature went up to 57.8*
It took a lot of soy wax flakes to fill the omelet pan, so I hope this works. I’d hate to have to scrape all that wax out without having had any heat benefit.
I think it will work.
Maybe I should have waited to see how long the omelet pan full of soy wax lasted, but I went ahead and ordered a stainless steel cake pan after I found a smaller clay pot, a square one with Chinese calligraphy on it, that I can use in the set-up that didn’t heat as well as that with the smaller clay pot inside.
1/8/2014 12:30 p.m. ~ The frying pan candle, pictured above, burned out in just over a day. I had thought it would last much longer, since it took a lot of soy wax to fill the pan.
I hadn’t measured the soy wax as I packed the frying pan, however, so I can’t say with any accuracy how the 4-wicked candle compared to my Survival Candles.
I would really like to know how the two forms of candle heating compare. So, I made another 4-wick frying pan candle, this time using RRD-29 wick. I think it might be a thinner wick. It doesn’t look thinner, but I think that’s because of the coating to make it impervious to hot wax when a candle is poured around it.
I measured out the soy wax as I packed the frying pan. I used three and a half jars of soy wax, unmelted, and a jar of melted soy wax.
A comparable amount of soy wax in jar candles would burn for at least 4 days, possibly as many as eight.
I’m really unclear how the man in the video got his 5-wick candle to burn for 5 days, and more.
This is what Peak Candle Supply says about the RRD-29 wick I’m using in today’s 4-wick, soy, frying pan candle:
RRD wicks are recommended for viscous waxes such as palm, soy and veggie waxes as well as single pour waxes. Use for pillars or containers.
• A unique round cotton braided wick that gives a slight curl when burning.
• Exhibits self-trimming burn characteristics.
• Primed with high melt wax (212F), which aids in keeping them straight in the molten wax.Suitable for 2 – 2.25″ diameter
1/10/2014 ~ OMG ~ So Pleased. The candles with RRD-29 wick, using soy Eco wax in pineapple tins are still going, and look as if they’ll make two days, easily. When I took temperature readings up close, this morning, they came in at 84*, while my Survival Candle pots of hot water came in 63*.
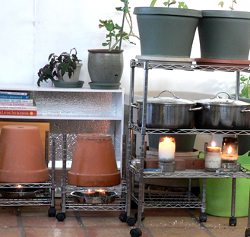
However when I took the temperature readings from across the room a bit later, they came in respectively at 55*, 60*, 58* and 58*. Though, by then I’d moved the two Flower Pot Heating set-ups closer to the doors to the deck so that I could get to a chrome cart I now want to use for a third set-up.
Generally, heating pots nearer the doors come in with somewhat cooler temperatures. For instance, the two stainless steel pots of water above the Survival Candles generally show at least a 5* difference, with the one on the right, toward the interior of the room, getting a higher reading.
In the picture it shows two candles under the pot on the right, but the candle that shows as a large flame in a somewhat blackened jar had actually gone out, so when I took the temperature readings both pots had a single candle, each.
Taking temperature readings, with my infrared thermometer, from 6 inches away, the clay pots show 75*, on the left, and 78* on the right, while the stainless pots, measured where there’s soot because from a shiny surface the readings don’t show up right, show 95* for the pot on the left and 103* for the pot on the right. (I had not idea the distance from which one measures had some much impact.)
Hallo! I’ve read your post – after seeing the video – and I find it all most interesting. I’m a potter, not very productive at the moment though, and controlling fire when firing ceramics is vital. I prefer raku techniques. So now, after reading about your project, I can feel my brain cells buzzing. Thinking shapes.
But, my reason for writing to you is about the wicks and the problem to keep them straight while the wax cools. You may try this: make a loop at the upper end of the wicks. Take thin sticks, long enough to fit
across the wax container and run them through the loops, and simply hang the wicks by placing the stick across the container. I might place a nail or something heavy in lower end to keep them from wandering with the hot flow.
Best wishes to you from @IngerHaapasaari
.
Hi Inger,
I’m delighted that you found my page and the video interesting.
I find it interesting that you began thinking about shapes, because that’s exactly what I did after I watched the video. His interior pot is shaped differently than any of mine.
The wick thing is slightly different than the problem of keeping wicks upright when you pour the candle wax. I used to do pretty much what you suggest, that’s when I encountered the problem of the wicks bending over in the wax once the candle was lit. That wouldn’t happen with pillar candles, but with container candles there’s a significant pool of hot wax, so the wick gets saturated and bends, then the flame goes out.
When you buy tabbed wicks, the wicks are treated with 212* melting point wax. Buying tabbed wicks runs up the price of the candles a bit.
The same effect can be achieved by using paraffin wax with a higher melting point, like straight paraffin for pillars to treat the wicks yourself ~ just dip them in, then let them cool. Straight pillar paraffin melts at 129*.
With my home treated wick I use a soy paraffin mix for the candle itself, since soy melts at around 123*
Thank you so much for your comment. I appreciate the time you took to write and share your insights!
Karen